

Photo by Michelle Middleton on Unsplash
Git Cheatsheet For Beginners
Accumulated Git cheatsheet since the start of my coding journey


It has been a few weeks since celebrating a year of my coding journey; today marks Day 385, to be exact. One of the essential skills in my 10-months coding boot camp is learning about version control or Git. I want to share my accumulated Git cheat sheet that I have put together since day 1. This cheat sheet is not exhaustive, and more to add. But, I hope it will be helpful for those who've just started their coding journey! Feedback is highly appreciated, and please comment on any parts that I should update, correct, and add.
Note: intended for terminal/CLI git on macOS.
Create a .gitignore
Creating a git ignore .gitignore is essential to keep your repository clean. For example, some files like .DS_Store on macOS should not be listed in the repository. Moreover, important files such as .env or .env.local, which may contain sensitive information like ApiKeys, should never be publicly shared.
To view any hidden files on macOS, you can press ⌘ + Shift + .
You can check if a .gitignore is already created in the project folder. You don't have to manually type the file extensions you want Git to ignore. There is gitignore.io that you can copy and paste from (e.g. type Node and macOS), but first, to create a .gitignore file in your project folder, on the terminal, type:
mkdir .gitignore
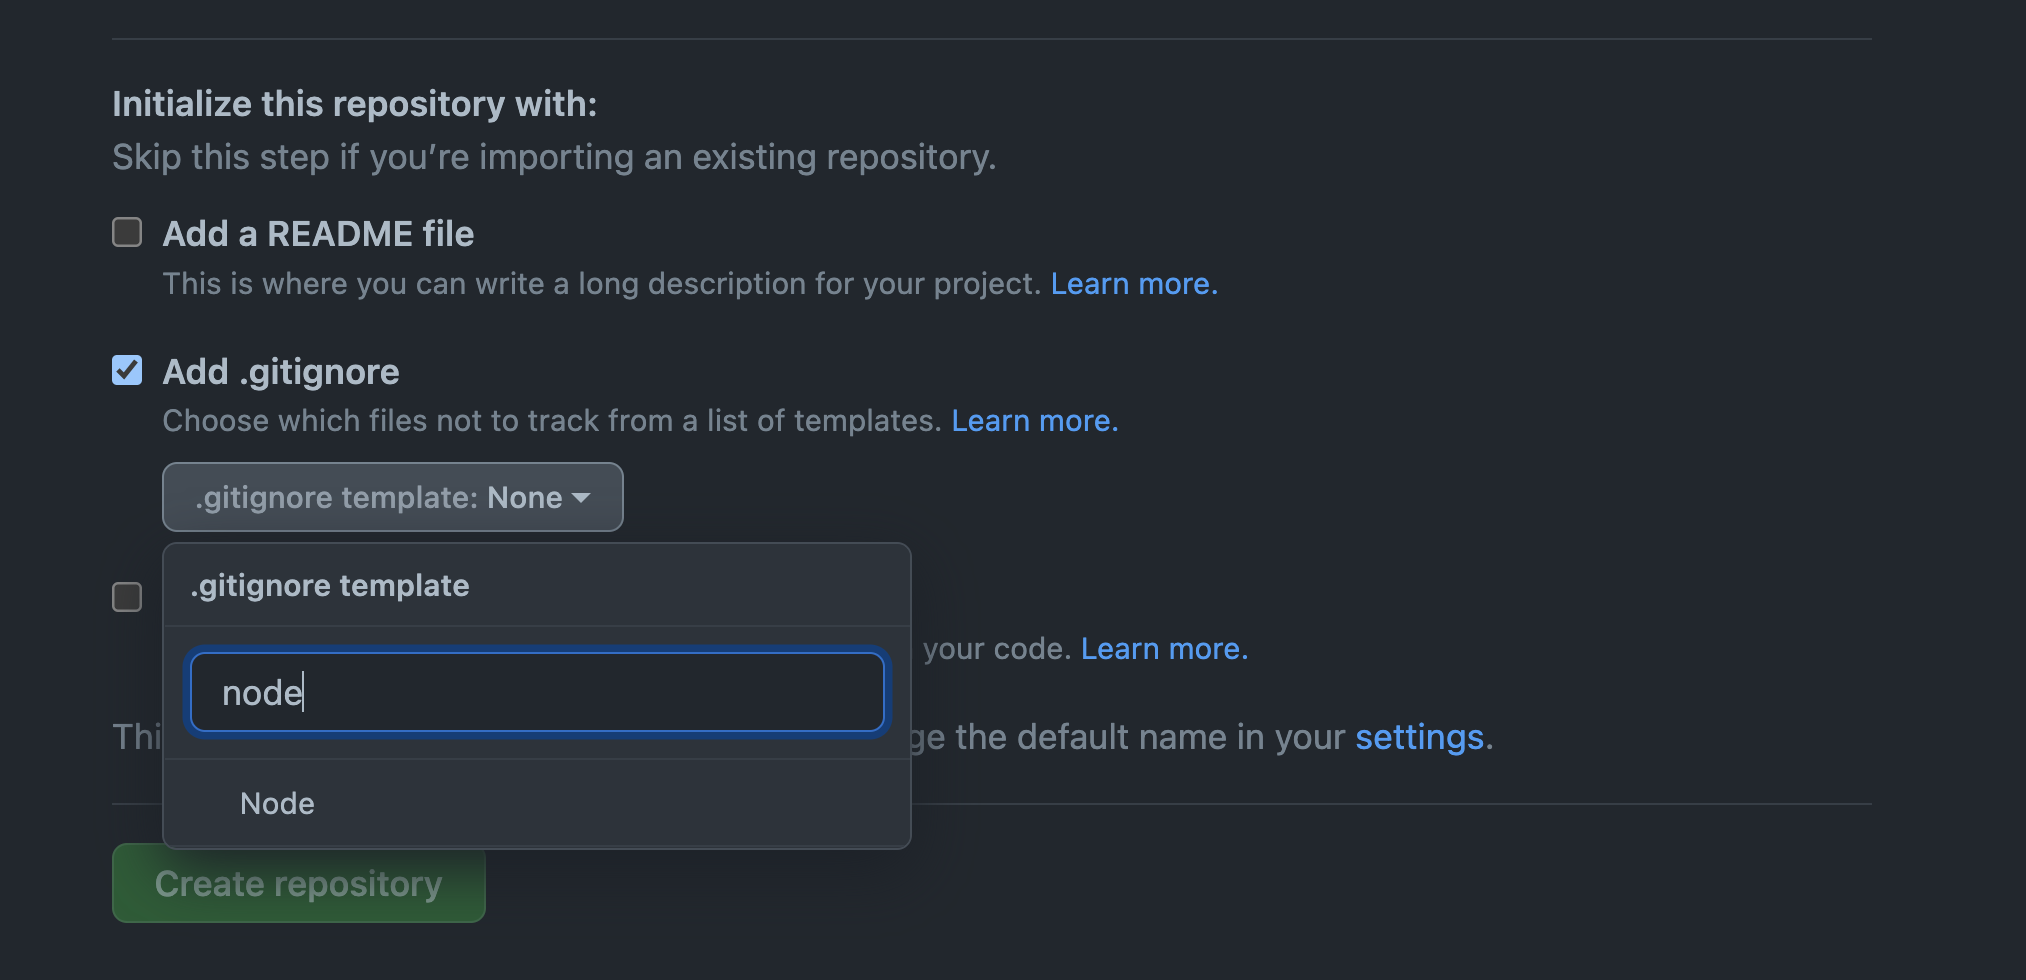
Then you can copy and paste the generated .gitignore file from gitignore.io with your code IDE, or you can also have GitHub generate one automatically for you. When you create a new repository on GitHub, tick the Add .gitignore option, then select the appropriate template.
Quick new branch creation & switching branches
To create a new branch and automatically switch or checkout to the newly created branch,
git checkout -b <branch_name>
For example, to create a branch named fix-footer-bug,
git checkout -b fix-footer-bug
Switching branches
When you create a new branch and you want to switch to a different branch, any changes to the new branch must be committed before switching. So, for example, if you want to go back to the main branch, but you're not ready to commit, you can use git stash to temporarily save your work in progress. Then when you are back to the branch you were working on, type git stash pop to restore the saved stash that can later be committed when ready.
To switch to different branches,
git checkout <branch_name>
View local existing branches
To check and view the available local existing branches, type git branch. When viewing, don't panic when you're not sure how to exit; simply press q, and you will exit the branch list.
Renaming a branch
Ensure that you are on the branch you want to rename, then type:
git branch -m <new_name>
Delete local branch
I think that it is a good habit to clean up any outdated and unused git branches locally or on the remote repository. To delete any unused branches locally,
git branch -d <branch-name>
Delete remote branch on GitHub
Click on the branches dropdown (from master or main) and select View all branches, then click the delete or trash bin icon next to the branch. Or you can also click the n branches link next to the dropdown to view all the available branches directly. Furthermore, to do this on the local CLI, type the following:
git push origin --delete <branch_name>
Push the local branch to remote and create a pull request
When it is ready to push the local branch to the remote repo for merging, firstly add all the changes to be committed with git add . It is common to write the commit message in present tense and as brief as possible and readable by others. For example, the following is a branch named fix-year to be committed and pushed:
git add .
git commit -m "fix hardcoded year on the footer"
git push origin fix-year
You will see a pull request highlighted in a yellow border on the GitHub repo page. Click it and add any necessary notes before clicking on create a pull request. If you're working solo, you can merge the branch if there is no conflict with the main branch. Otherwise, in a team collaboration (which I will discuss below), ideally, other team members do the merging after a code review.
After merging pull requests, it is advised to delete the head branch immediately. You can also set this automatic deletion in the repository settings. First, on the GitHub repository page, click on the Settings, then scroll down to the Pull Requests section and tick the Automatically delete head branches just before the Archives heading section.
Fixing case-sensitivity GitHub folder
Not for the sake of being OCD about file management 😅, but when we locally renamed folders inside a project, the remote GitHub repository folders won't change the case-sensitivity after it's pushed to the remote. During deployment, I discovered this case-sensitivity issue for one of my projects; as a result, some imports and links were broken. According to this article, it could be due to some default settings on GitHub and the local system that caused the case-sensitivity issue.
A way to fix the case-sensitivity issues without changing the default settings is to type the following on the terminal; the example below is to fix the folder renaming of Svgs to svgs in the src/components path. You must include the full path to the folder for it to work.
git mv src/components/Svgs temp && git mv temp src/components/svgs
Git collaboration
Working with multiple developers on the same repository can be frustrating at first, especially when there are merge conflicts. Based on the team project at the boot camp, we utilised branching git collaboration. We use one repository and create branches locally instead of first forking the main repository.
Make sure to add all the contributors in the GitHub repository settings, ensuring that everyone has access to send a pull request directly from their local machines.
When working collaboratively, the most critical thing is always to remember to create a new branch locally; if necessary, put a post-it note as a reminder! It is not a good practice to work in the main branch directly, as it will cause a merge conflict.
When we create a pull request, we will usually ask another team member to review our codes and merge the pull request safely. When the merging is successful, always remember to switch, or checkout to the main branch (or also common is the development branch or the feature branch), and locally, we have to pull and update the merged files,
git checkout main

git pull origin main
Instead of executing git pull origin main, some advised using rebase,
git pull --rebase
Executing the above will pull all the new changes from the repository to the local machine. I usually delete the local branch that has just been merged, then create a new branch from the most updated main branch to continue working on a new ticket or task.
Git collaboration – checking remote branches locally without merging
Sometimes when doing a code review, we may want to check the code properly on the code IDE locally based on the new uploaded branch (before merging). To do this, we first fetch the updated branches, then we can directly checkout the branch, for example, to fetch the fix-bug-login branch,
git fetch

git checkout fix-bug-login
The terminal will automatically switch the branch, and we can properly review the code.
This git collaboration is based on my team project at the boot camp. I am sure every company has specific ways to do the git collaboration according to the best practices and implement CI/CDs. I will make sure to update this article when I learn it professionally! But, I hope that you find this git cheatsheet helpful.